将 NativeScript 嵌入到现有的 iOS 应用中(第一部分)
这是关于将 NativeScript 嵌入到现有平台应用程序系列中的第一部分。
- → 第 1 部分 - 将 NativeScript 嵌入到现有的 iOS 应用中
未来将探讨的主题
- 使用自定义 iOS 元数据嵌入 NativeScript
- 将 NativeScript 嵌入到现有的 Android 应用中
- 使用自定义 Android 元数据嵌入 NativeScript
- 嵌入 NativeScript 影响分析、大小和总结
您可以将 NativeScript 嵌入到任何现有的 iOS 应用中以进行临时使用。一个之前的帖子几年前曾简要提到过这一点。本系列将提供一个清晰的分步指南,涵盖所有现代改进。
在过去的几年里,NativeScript 已经发展成熟,其成熟度的一部分体现在扩展性的增强。
我们现在只需安装一个 Cocoapod 即可从任何 iOS 应用中使用它。这不仅提供了嵌入整个 NativeScript 应用的能力(我们将进行演示),还可以将 SDK 纯粹用作通用的 JavaScript 引擎。
分步指南
为了尽可能全面,我们将逐步演示从零到一个完全可工作的示例。
1. 创建一个 Xcode 项目
打开 Xcode 并选择“文件”>“新建”>“项目”
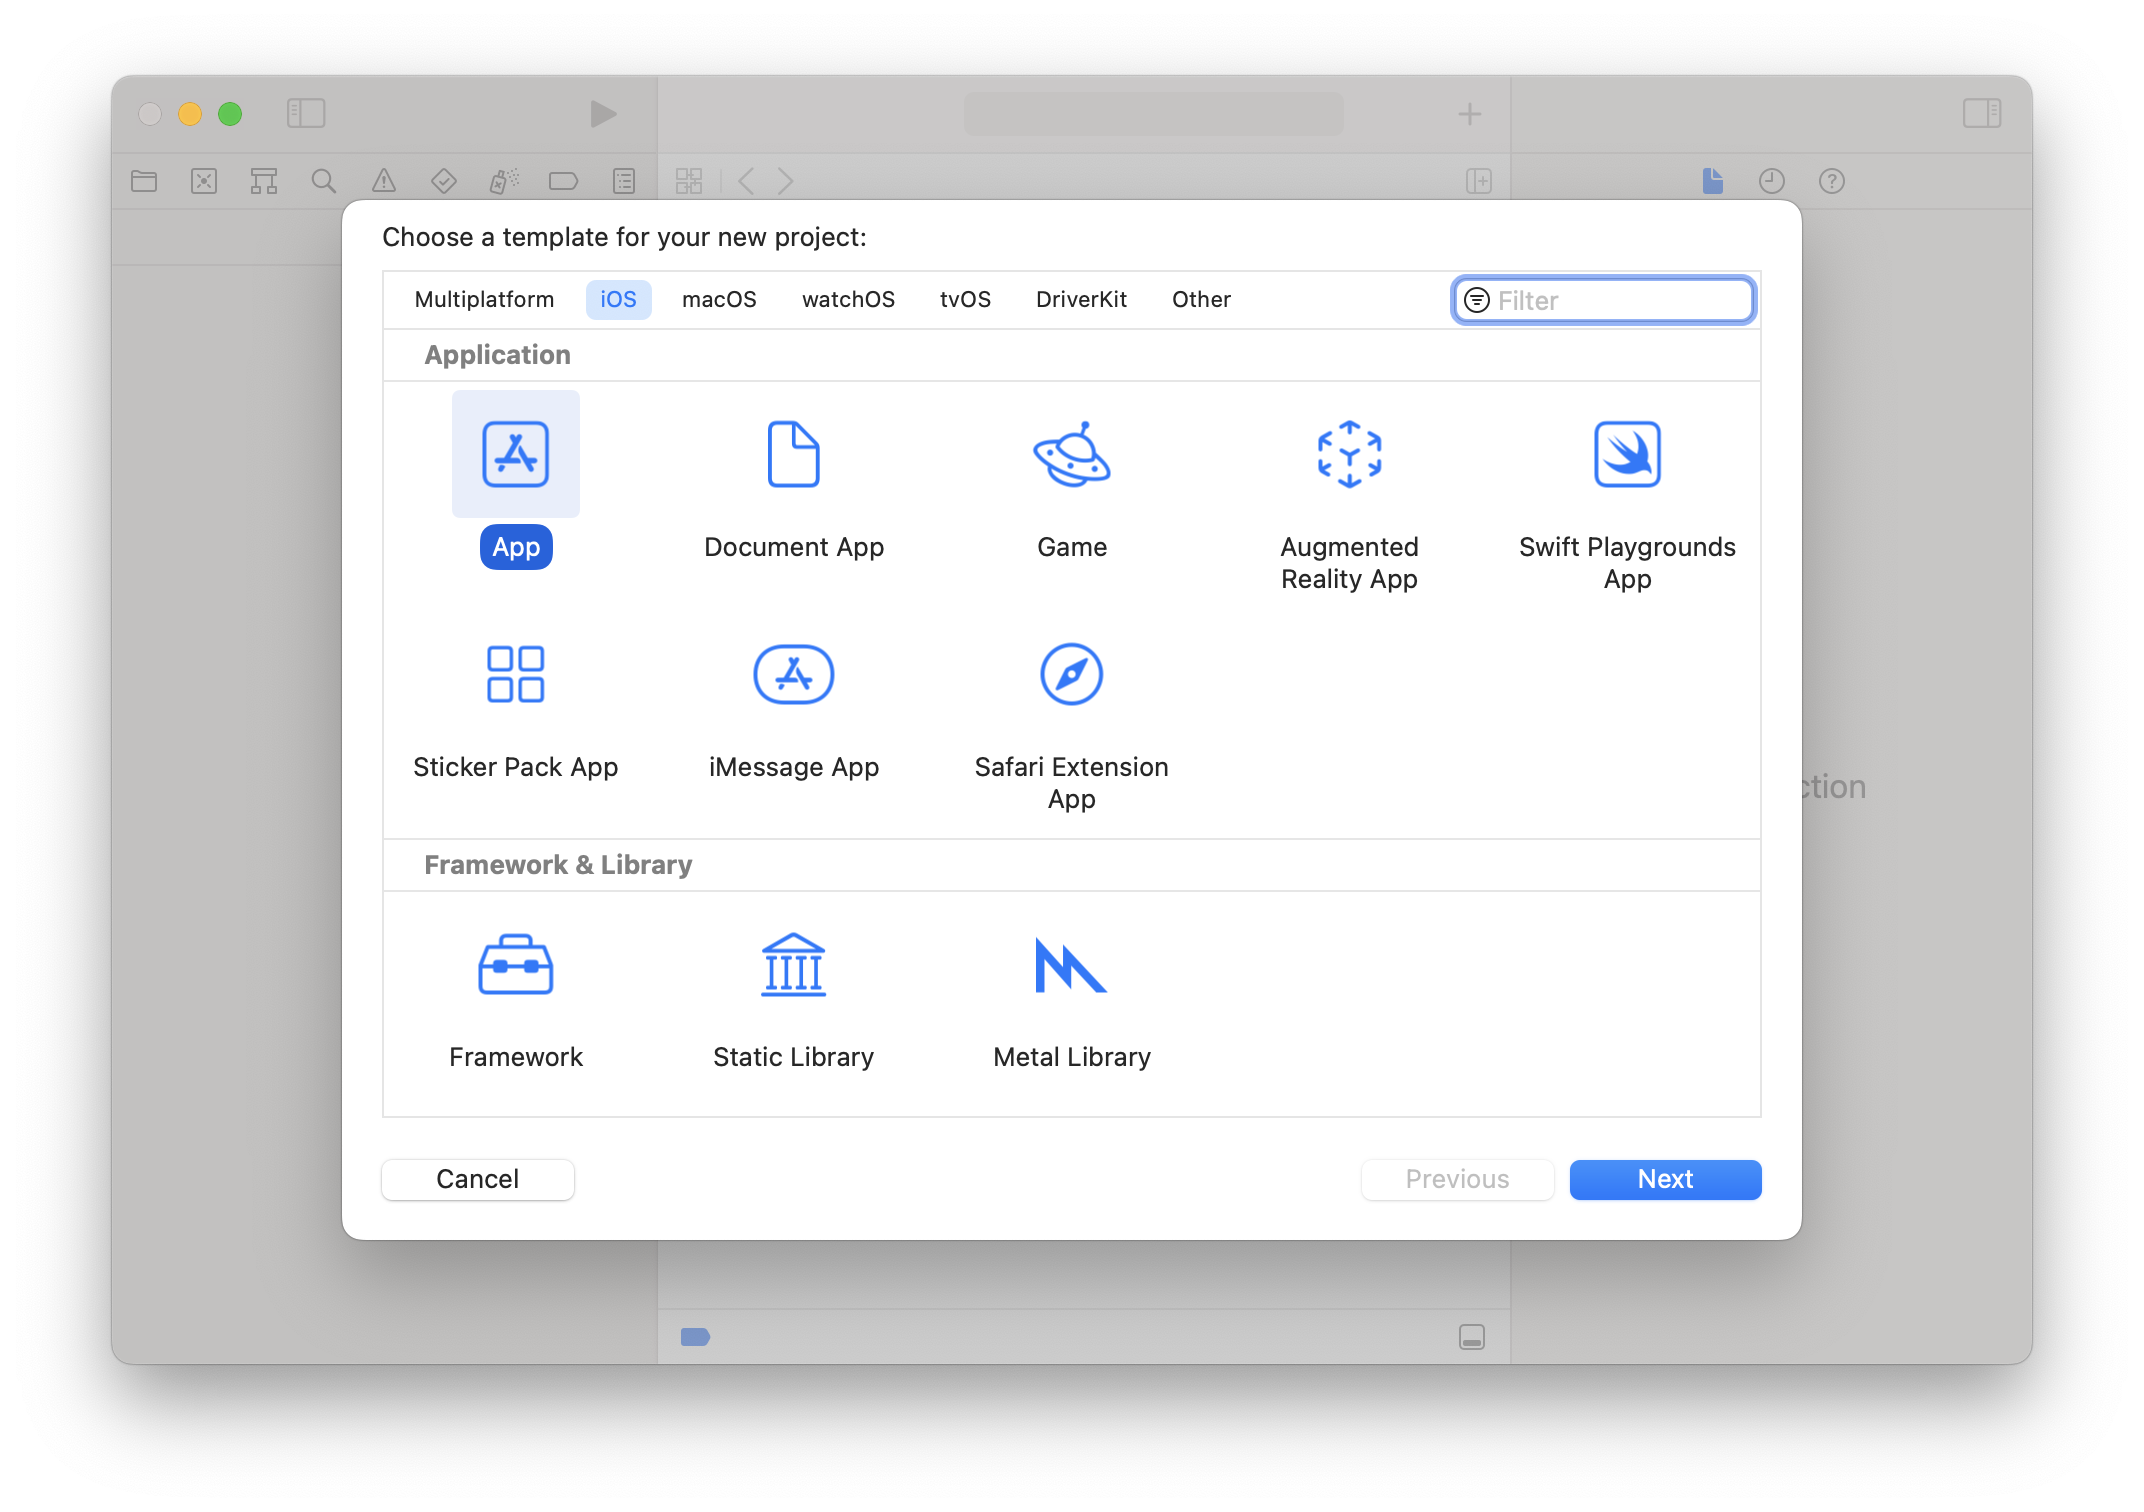
确保顶部选择了“iOS”过滤器,并选择了“App”选项,然后选择“下一步”。
我们可以命名我们的应用,例如:MyCoolApp,选择一个团队,我们将使用Swift作为基本语言,然后选择“下一步”。
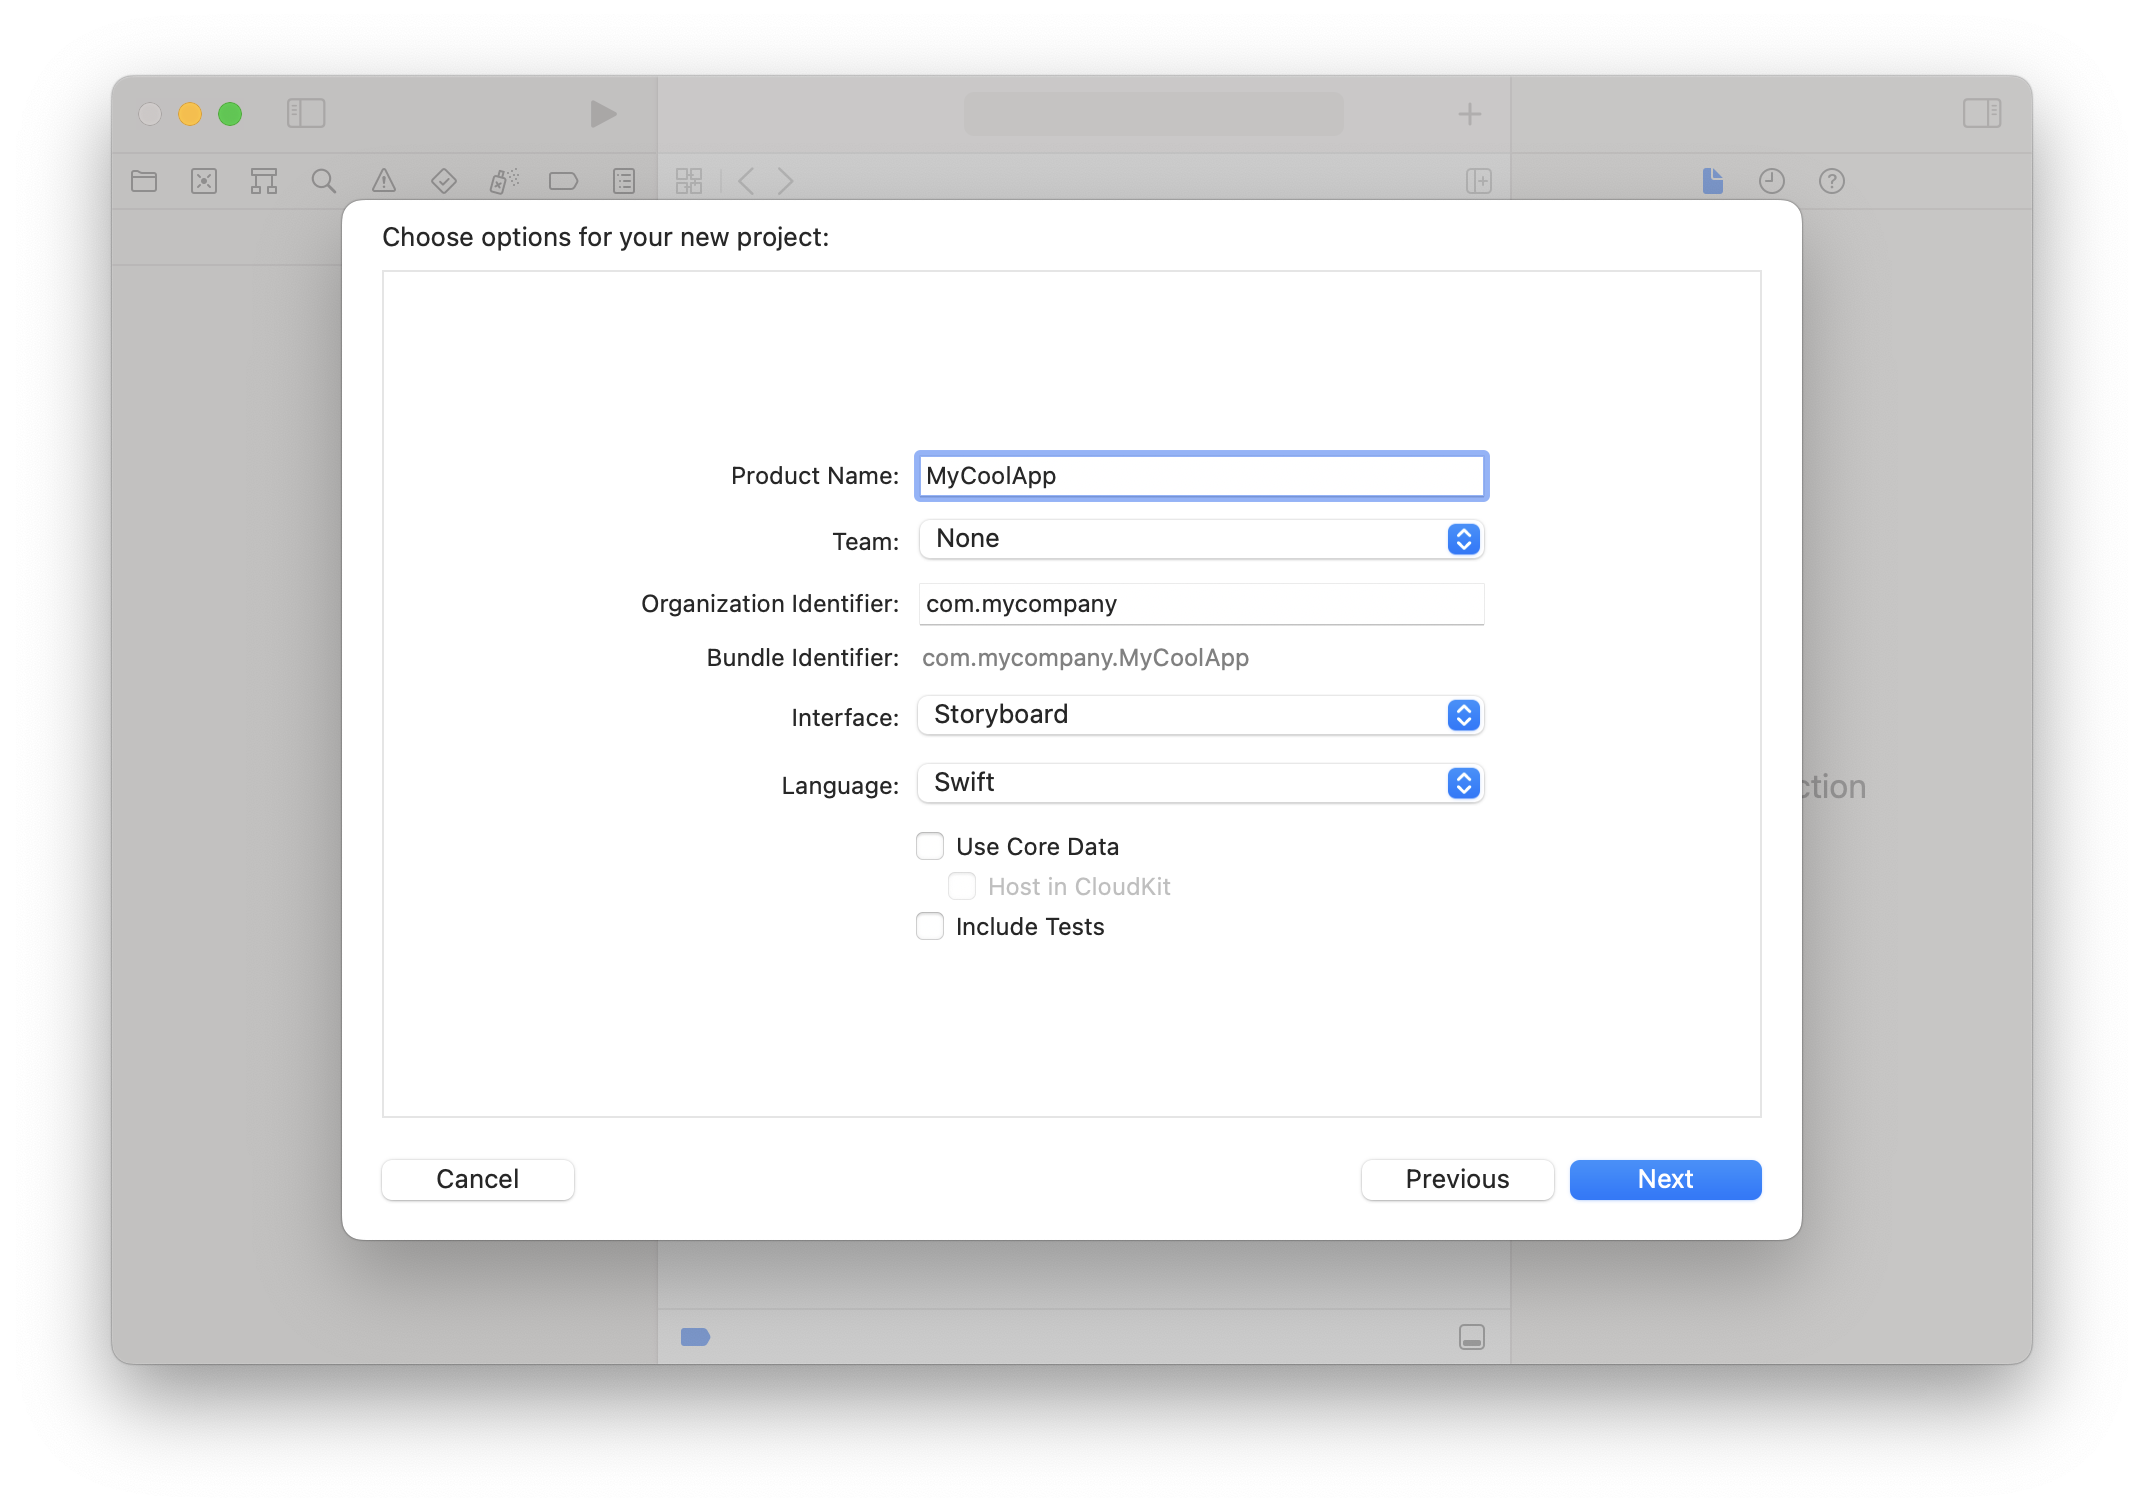
系统将提示您选择一个位置来保存项目,现在我们已经准备就绪。
2. 添加 Podfile 以使用 NativeScriptSDK
platform :ios, '15.0'

target 'MyCoolApp' do
  use_frameworks!
  pod 'NativeScriptSDK', '~> 8.4.2'
  pod 'NativeScriptUI', '~> 0.1.2'
end
您现在应该有一个类似这样的文件树
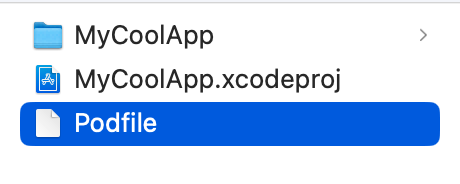
现在在该目录中运行 pod install,您应该会看到类似这样的输出
$ pod install
Analyzing dependencies
Downloading dependencies
Installing NativeScriptSDK (8.4.2)
Installing NativeScriptUI (0.1.2)
Generating Pods project
Integrating client project
[!] Please close any current Xcode sessions and use `MyCoolApp.xcworkspace` for this project from now on.
Pod installation complete! There are 2 dependencies from the Podfile and 2 total pods installed.
[!] Your project does not explicitly specify the CocoaPods master specs repo. Since CDN is now used as the default, you may safely remove it from your repos directory via `pod repo remove master`. To suppress this warning please add `warn_for_unused_master_specs_repo => false` to your Podfile.
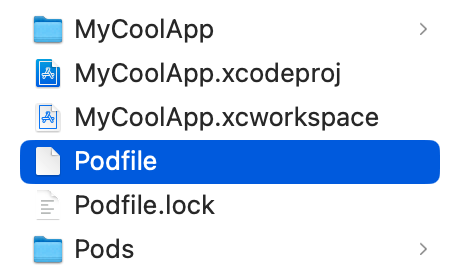
这将创建一个包含 Pod 的 .xcworkspace 文件,因此您的目录现在将如下所示
3. 使用 NativeScriptSDK
让我们打开 MyCoolApp.xcworkspace 文件,以便现在将 NativeScriptSDK 用于我们的工作。
您可以呈现完全独立的 NativeScript 应用,或者只是在模态窗口中呈现隔离的视图(例如:微前端风格),导航到它们,或者如果您愿意,甚至可以替换应用的整个框架。我们将演示如何在模态窗口中呈现 NativeScript 应用,以说明事情可以多么简洁。
A. 符合 NativeScriptEmbedderDelegate
让我们创建一个新的 Swift 文件以符合 SDK 的 NativeScriptEmbedderDelegate 协议,并充当我们可以从任何地方使用的呈现器。
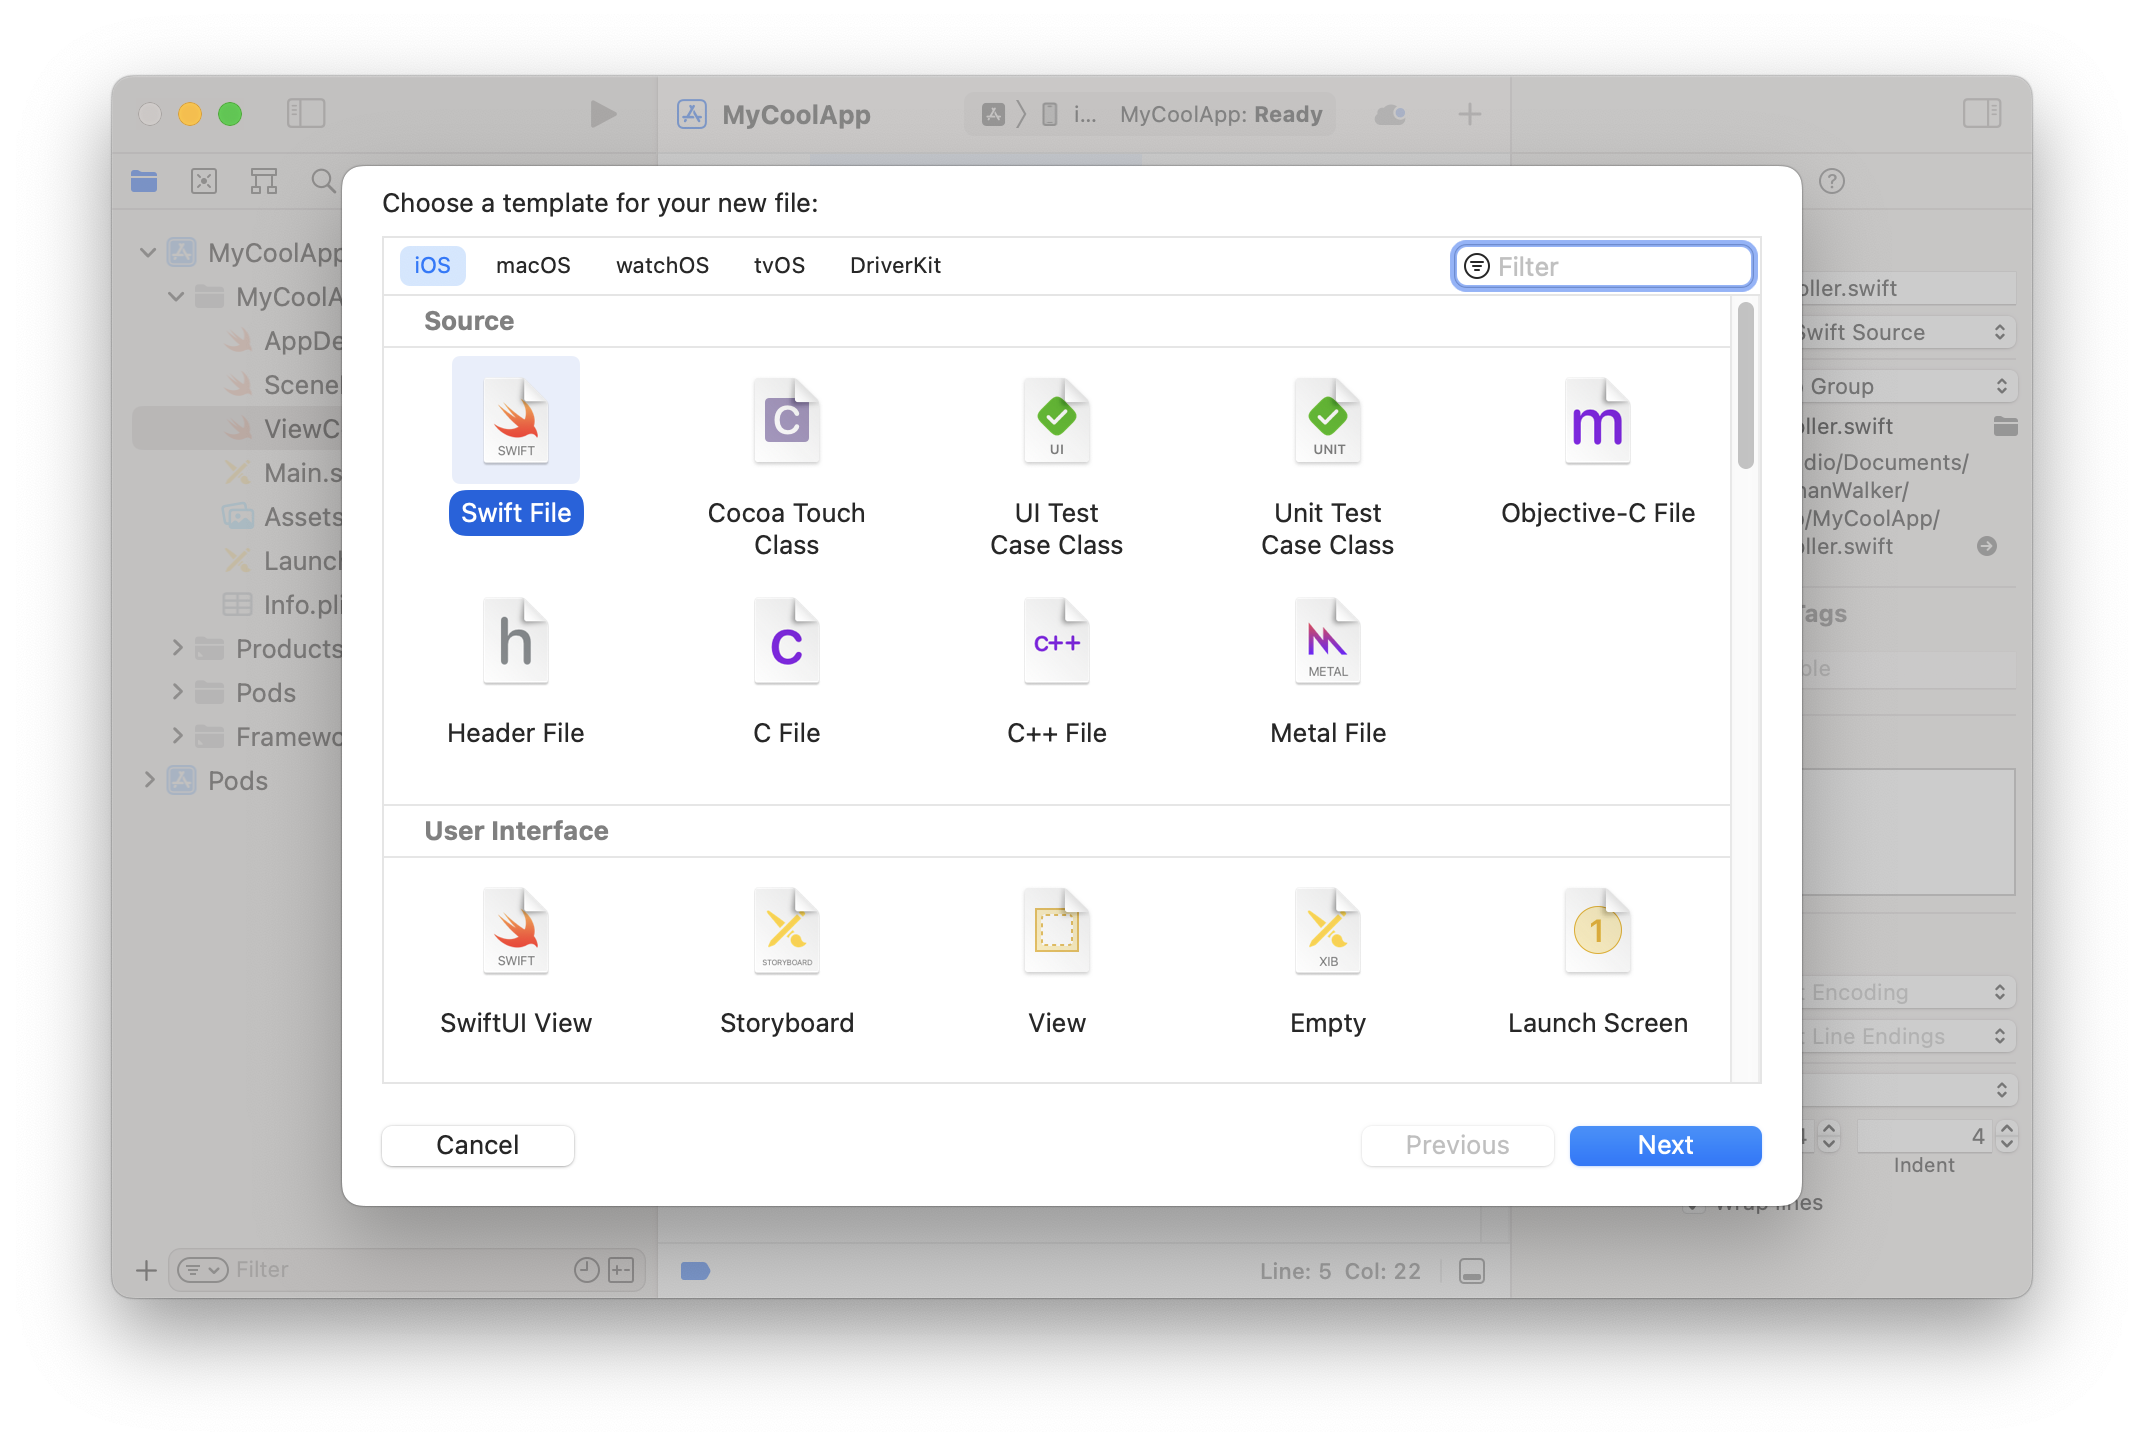
“文件”>“新建”>“文件”,然后只需选择“Swift 文件”选项
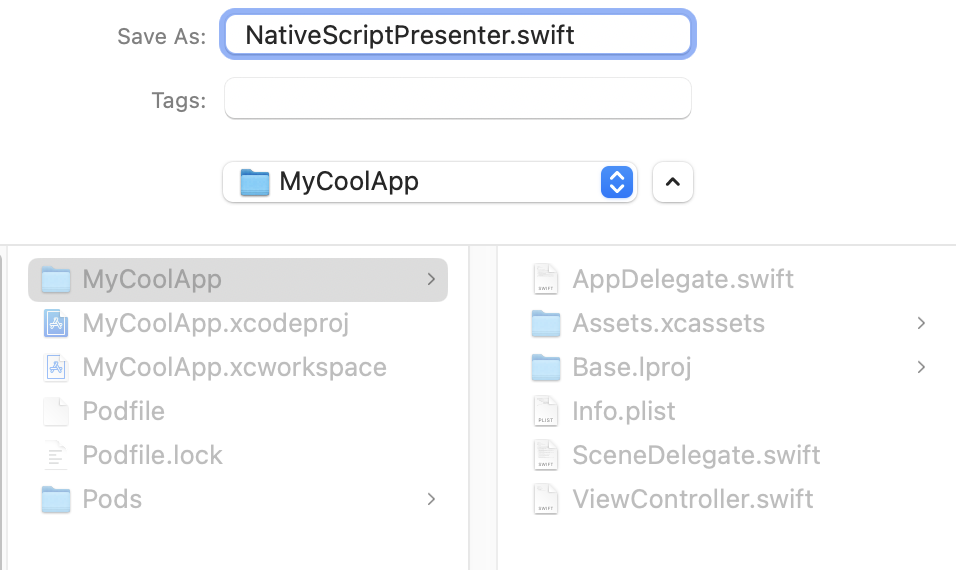
我们将文件命名为 NativeScriptPresenter.swift
让我们用以下内容替换该文件的内容
import UIKit
import NativeScriptSDK

public class NativeScriptPresenter: NSObject, NativeScriptEmbedderDelegate {
  var vc: UIViewController?

  public func presentNativeScriptApp(_ vc: UIViewController!) -> Any! {
    vc.view.backgroundColor = UIColor.white
    self.vc?.present(vc, animated: true)
    return vc;
  }
}
我们导入 NativeScriptSDK 并允许我们的类实现 NativeScriptEmbedderDelegate 协议,该协议要求定义 presentNativeScriptApp。当您的 NativeScript 应用启动时,此函数由您的 NativeScript 应用调用,并传递其 ViewController,以便您可以按任何您喜欢的方式呈现它。
B. 确保您的 Bridging-Header.h 包含 NativeScript
许多已建立的 iOS 应用已经有一个桥接头文件,但由于我们是从头开始创建的,因此让我们添加一个以确保 NativeScript 可以被配置。
Xcode 在首次添加桥接头文件时提供了一个便利,可以自动配置它。只需首次创建一个 Objective C 文件,系统将提示您自动创建一个,因此让我们这样做。
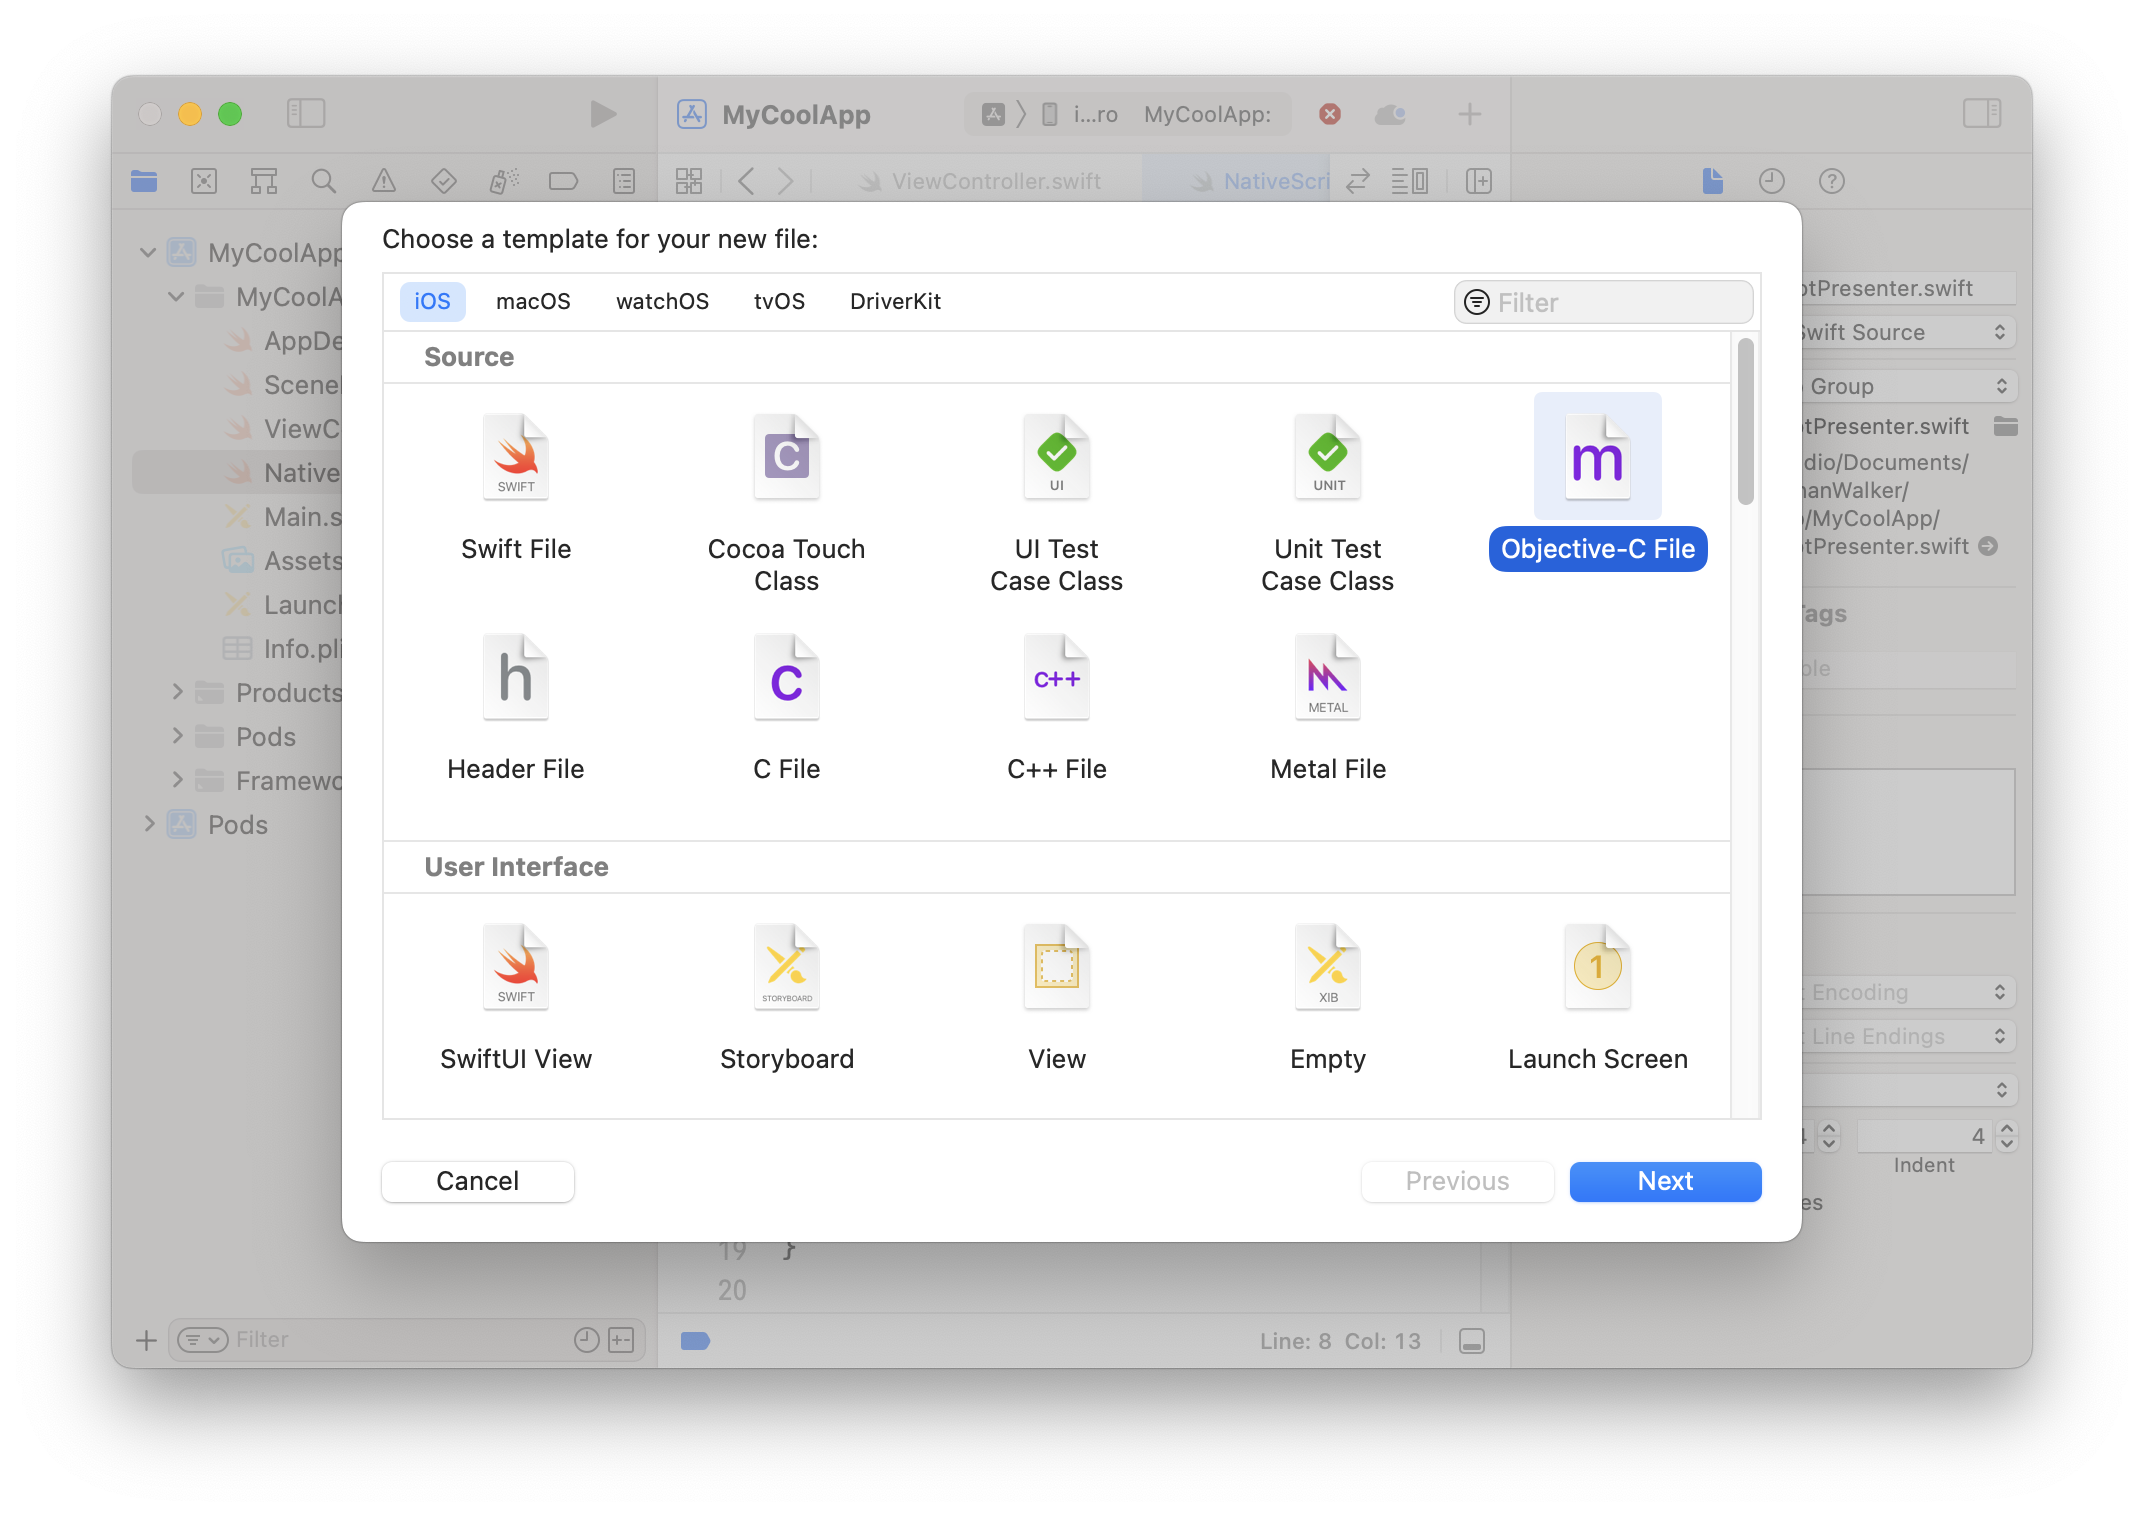
“文件”>“新建”>“Objective-C 文件”,将其命名为“Sample”(因为我们实际上会在稍后将其删除)
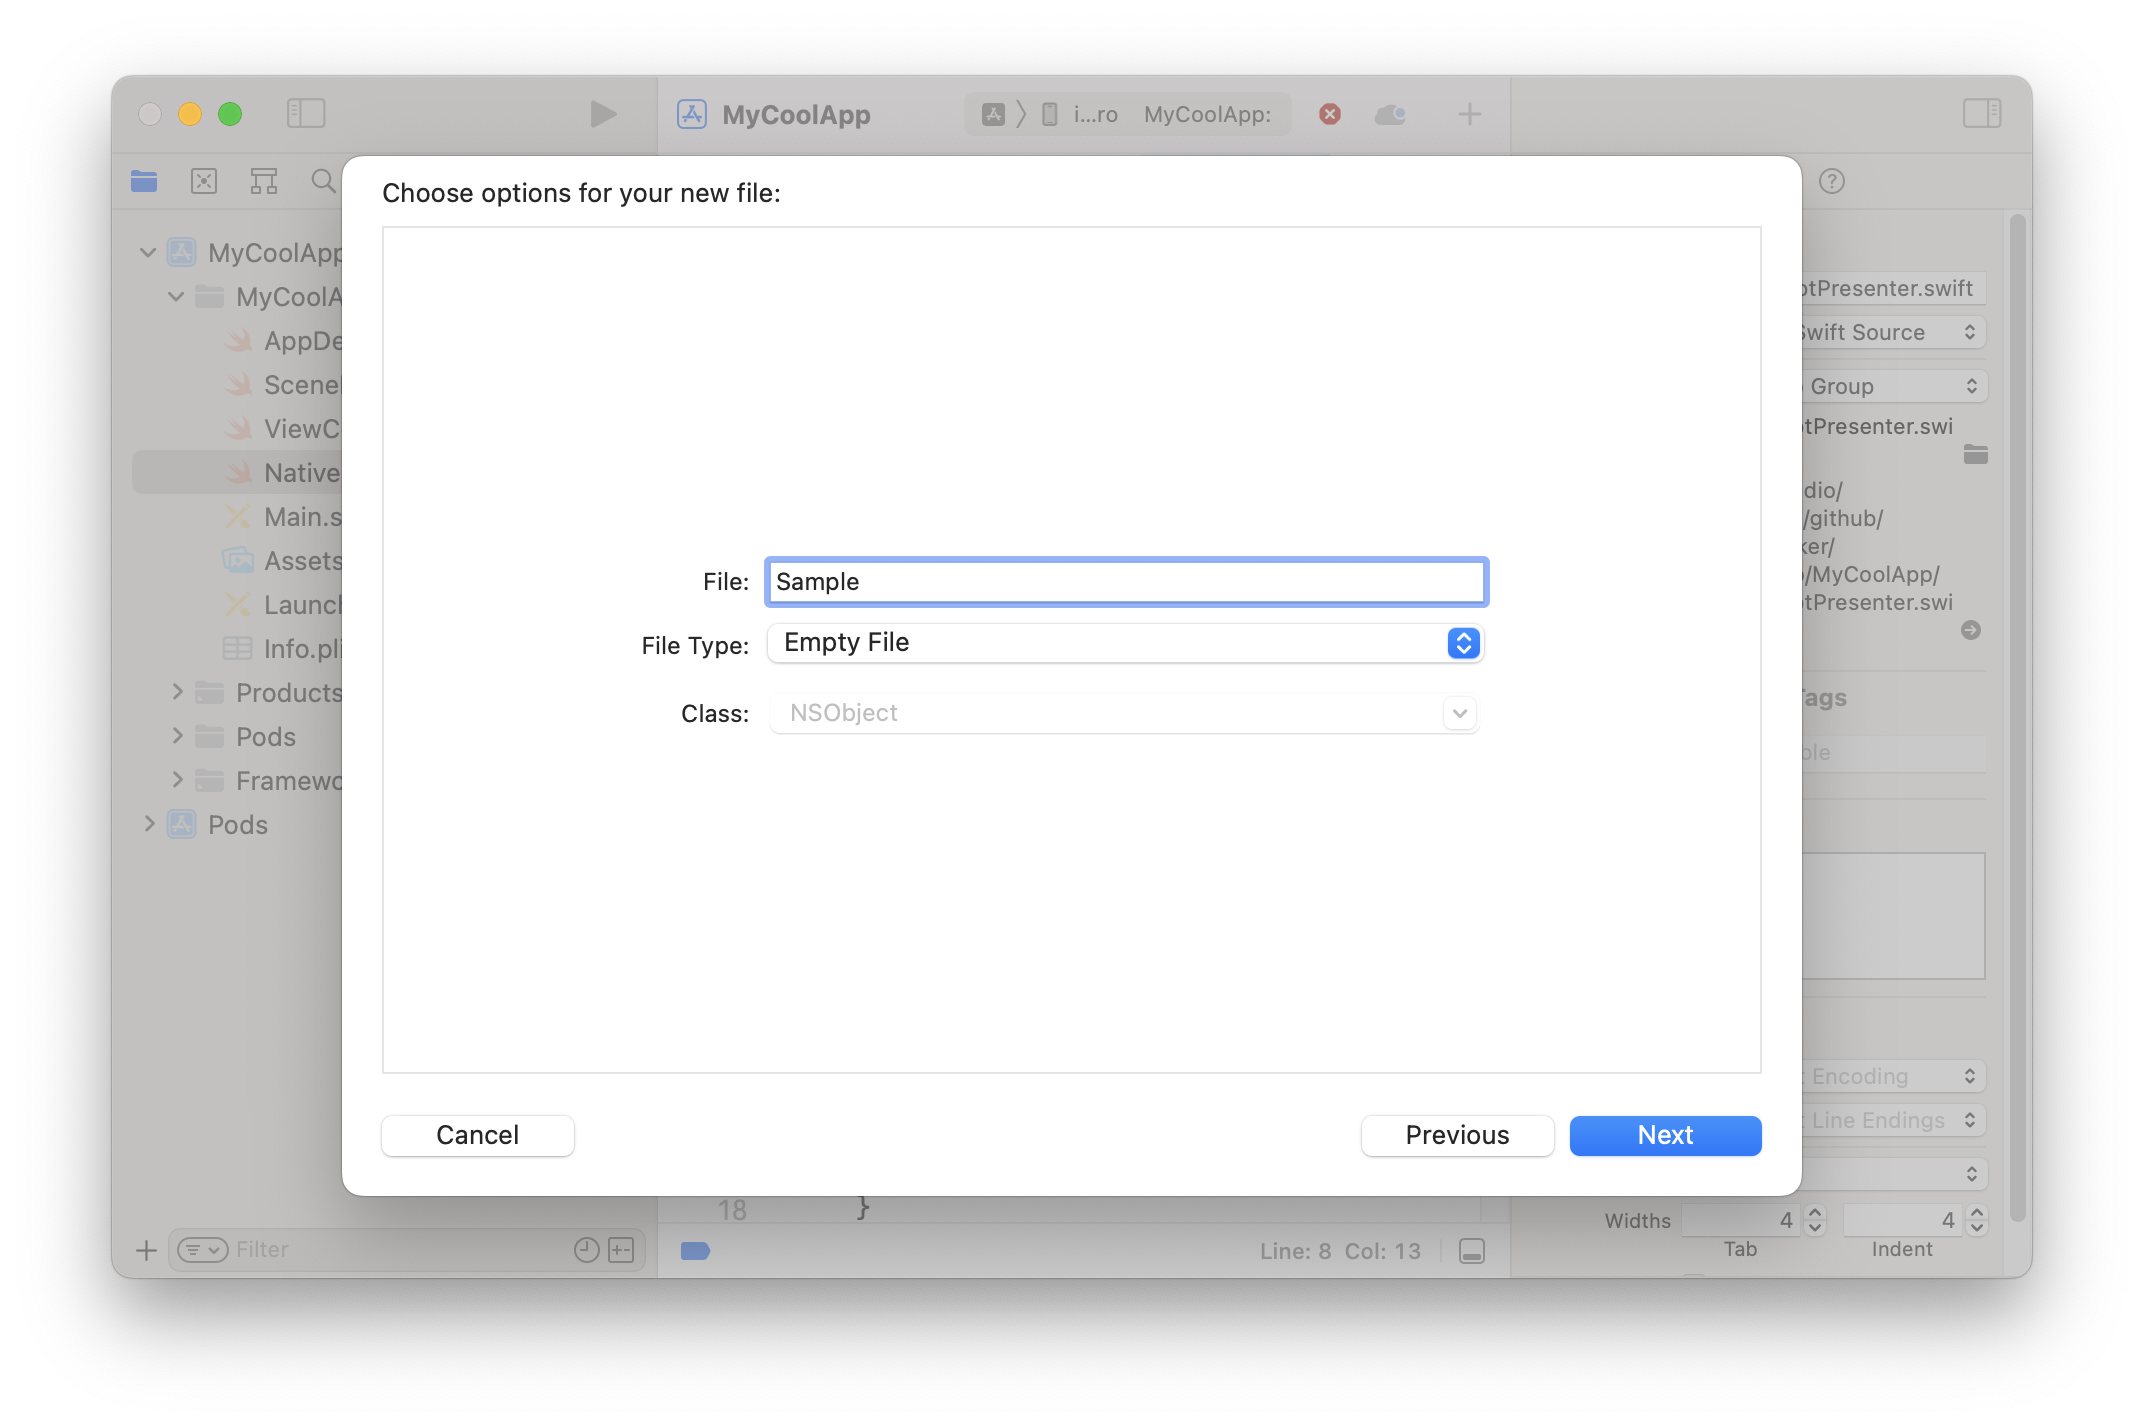
然后,系统将提示您“创建桥接头”
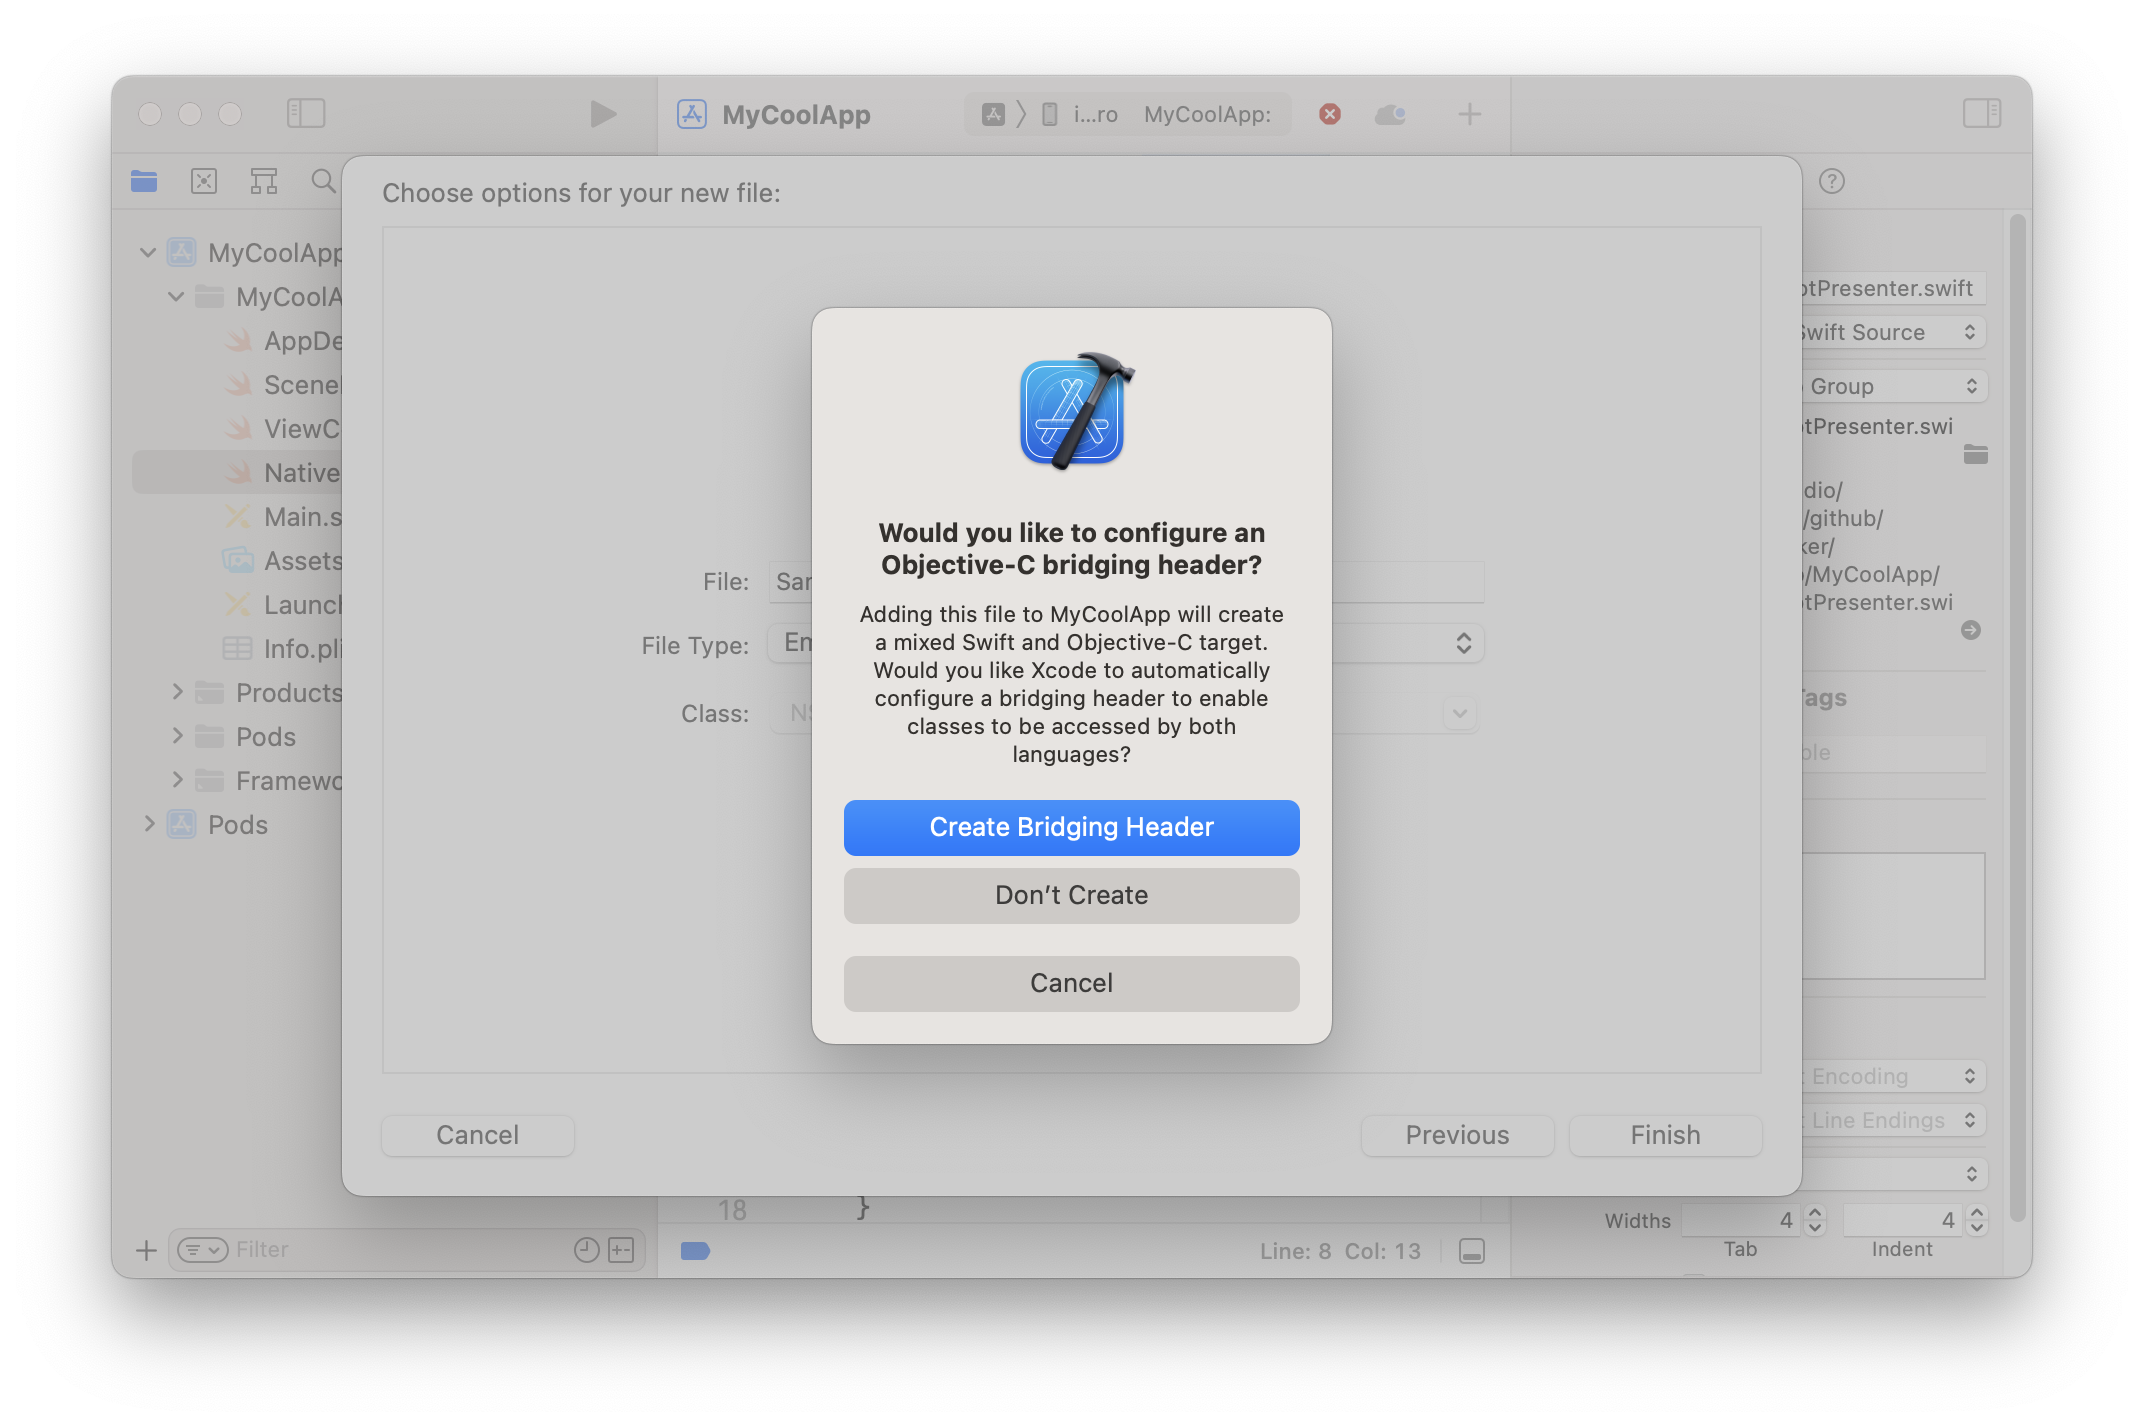
Xcode 通过这种方式处理时会自动配置我们的项目,这很好。您现在将看到我们创建的 Sample.m 文件
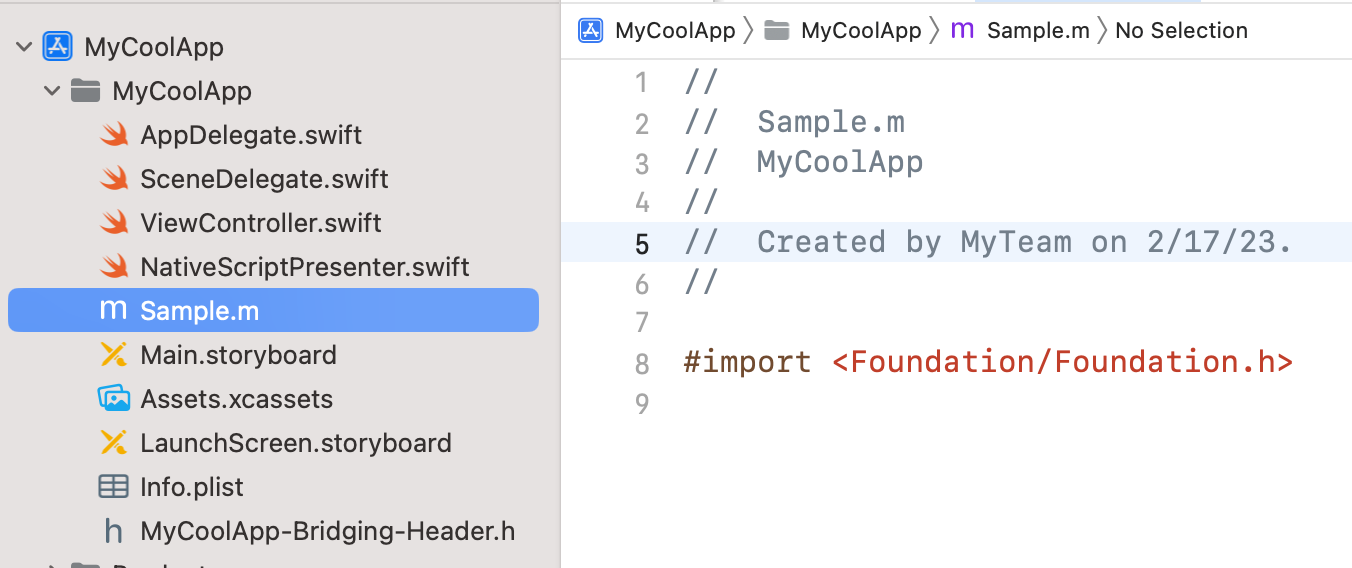
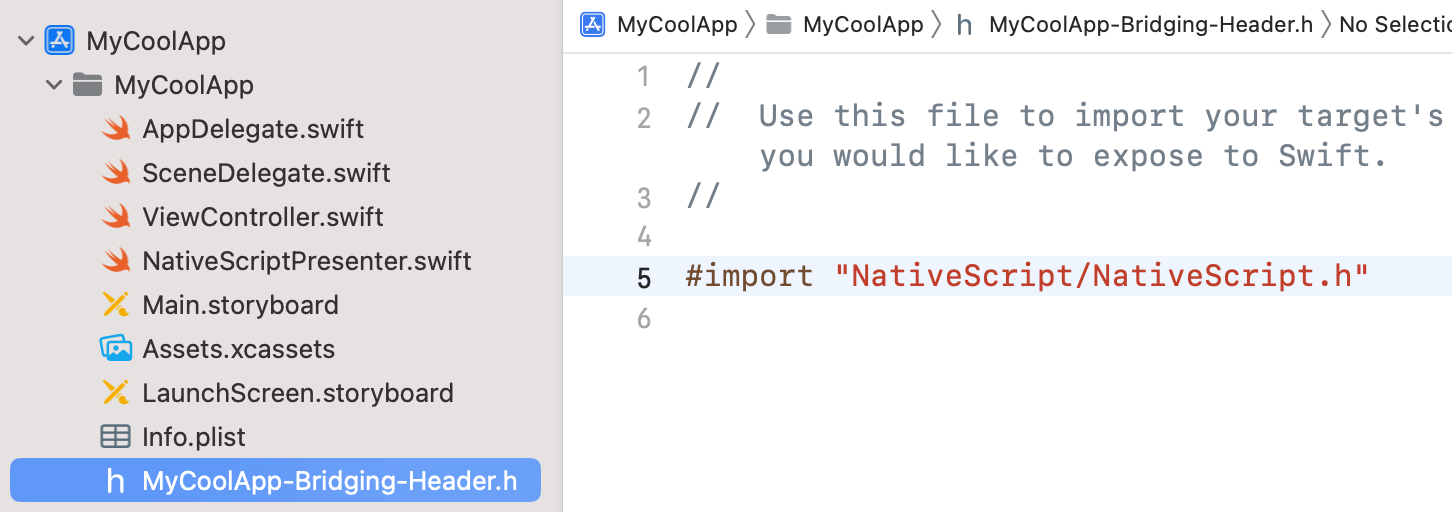
您还会注意到它自动创建的 MyCoolApp-Bridging-Header.h 文件,这是我们想要的全部,因此我们可以简单地删除 Sample.m 并将 NativeScript/NativeScript.h 添加到其中
C. 配置任何 ViewController 以使用 SDK
我们现在可以配置任何 iOS 应用的 ViewController 以使用 NativeScript。让我们使用 Xcode 为我们创建的 ViewController.swift 文件,并将内容替换为以下内容
import UIKit
import NativeScriptSDK

class ViewController: UIViewController {

  var nativeScriptPresenter: NativeScriptPresenter?

  override func viewDidLoad() {
    super.viewDidLoad()
    // setup the NativeScript presenter by providing it this ViewController
    // and using the presenter as the NativeScriptEmbedder's delegate
    nativeScriptPresenter = NativeScriptPresenter()
    nativeScriptPresenter?.vc = self
    NativeScriptEmbedder.sharedInstance().setDelegate(nativeScriptPresenter)

    // to demonstrate, we'll just add a simple button to open it
    let button = UIButton(type: .system)
    button.titleLabel?.font = UIFont(name: "Helvetica", size: 20)
    button.frame = CGRectMake(0, 0, 300, 50)
    button.center = self.view.center
    button.setTitle("Open NativeScript App", for: UIControl.State.normal)
    button.addTarget(self, action: #selector(self.openMyNativeScriptApp), for: UIControl.Event.touchUpInside)
    self.view.addSubview(button)
  }

  override func viewDidAppear(_ animated: Bool) {
    super.viewDidAppear(animated)
  }

  @IBAction func openMyNativeScriptApp(_ sender: Any) {
    self.setupNativeScript(appFolder: "app")
  }

  func setupNativeScript(appFolder: String?) {
    DispatchQueue.global(qos: .userInitiated).async {
      // init the NativeScript v8 instance on background thread
      let config = Config()
      config.logToSystemConsole = true
      config.baseDir = Bundle.main.resourcePath
      config.applicationPath = appFolder
      let ns = NativeScript(config: config)

      // run the NativeScript app on the ui thread
      DispatchQueue.main.async {
        ns?.runMainApplication();
      }
    }
  }
}
有两个实现步骤可以使 NativeScriptSDK 在您的 iOS 应用中蓬勃发展
- SDK 需要知道使用哪个 ViewController 来呈现应用。这是通过使用
NativeScriptEmbedder的setDelegate方法实现的,该方法允许我们指定 iOS 将委托给谁的责任
nativeScriptPresenter = NativeScriptPresenter()
nativeScriptPresenter?.vc = self
NativeScriptEmbedder.sharedInstance().setDelegate(nativeScriptPresenter)
- 配置v8 实例,并使用该配置运行指定的捆绑包
我们可以在后台线程上配置 v8,以避免中断在 UI 线程上发生的任何按钮点击处理,以与 NativeScript 交互
DispatchQueue.global(qos: .userInitiated).async {
  // init the NativeScript v8 instance
  let config = Config()
  config.logToSystemConsole = true
  config.baseDir = Bundle.main.resourcePath
  config.applicationPath = appFolder
  let ns = NativeScript(config: config)
Config 的 applicationPath 默认情况下会查找名为 app 的文件夹。但是,如果您愿意,您可以通过为一个或多个 NativeScript 捆绑屏幕指定您自己的文件夹名称来覆盖它——有关实际配置为打开 5 个截然不同的 NativeScript 捆绑包的应用,请参阅本文底部提到的示例代码库。
然后我们在 UI 线程上运行应用
// run the NativeScript app
DispatchQueue.main.async {
  ns?.runMainApplication();
}
调用 runMainApplication 将触发 NativeScriptEmbedder,它将使用其配置的委托来调用 presentNativeScriptApp,并将 NativeScript 应用中的 ViewController 传递给您的宿主应用,以便您按任何您喜欢的方式显示它。
我们现在已经配置了我们的 iOS 应用以执行一些非常巧妙的操作。剩下的就是嵌入一些 NativeScript 了。
4. 嵌入一些 NativeScript 🪄
本系列使用了一些新的改进功能,这些功能将成为即将发布的 @nativescript/core 8.5 版本的一部分。
您可以通过将您的应用配置为使用以下内容来立即尝试它们:"@nativescript/core": "next"
对于此示例,我们将只嵌入一个完整的原生(基于 TypeScript)NativeScript 应用
ns create myapp --tsc
cd myapp

ns prepare ios
open platforms/ios
您应该会看到类似以下的输出

所有 iOS 应用都需要的是捆绑的 .js 代码,该代码位于该 app 文件夹内。可以将该文件夹名称重命名为您在 iOS 应用中配置 NativeScript 时希望引用的任何名称。让我们只需将该文件夹拖放到 iOS 应用中,并确保选择“如果需要,复制项目”
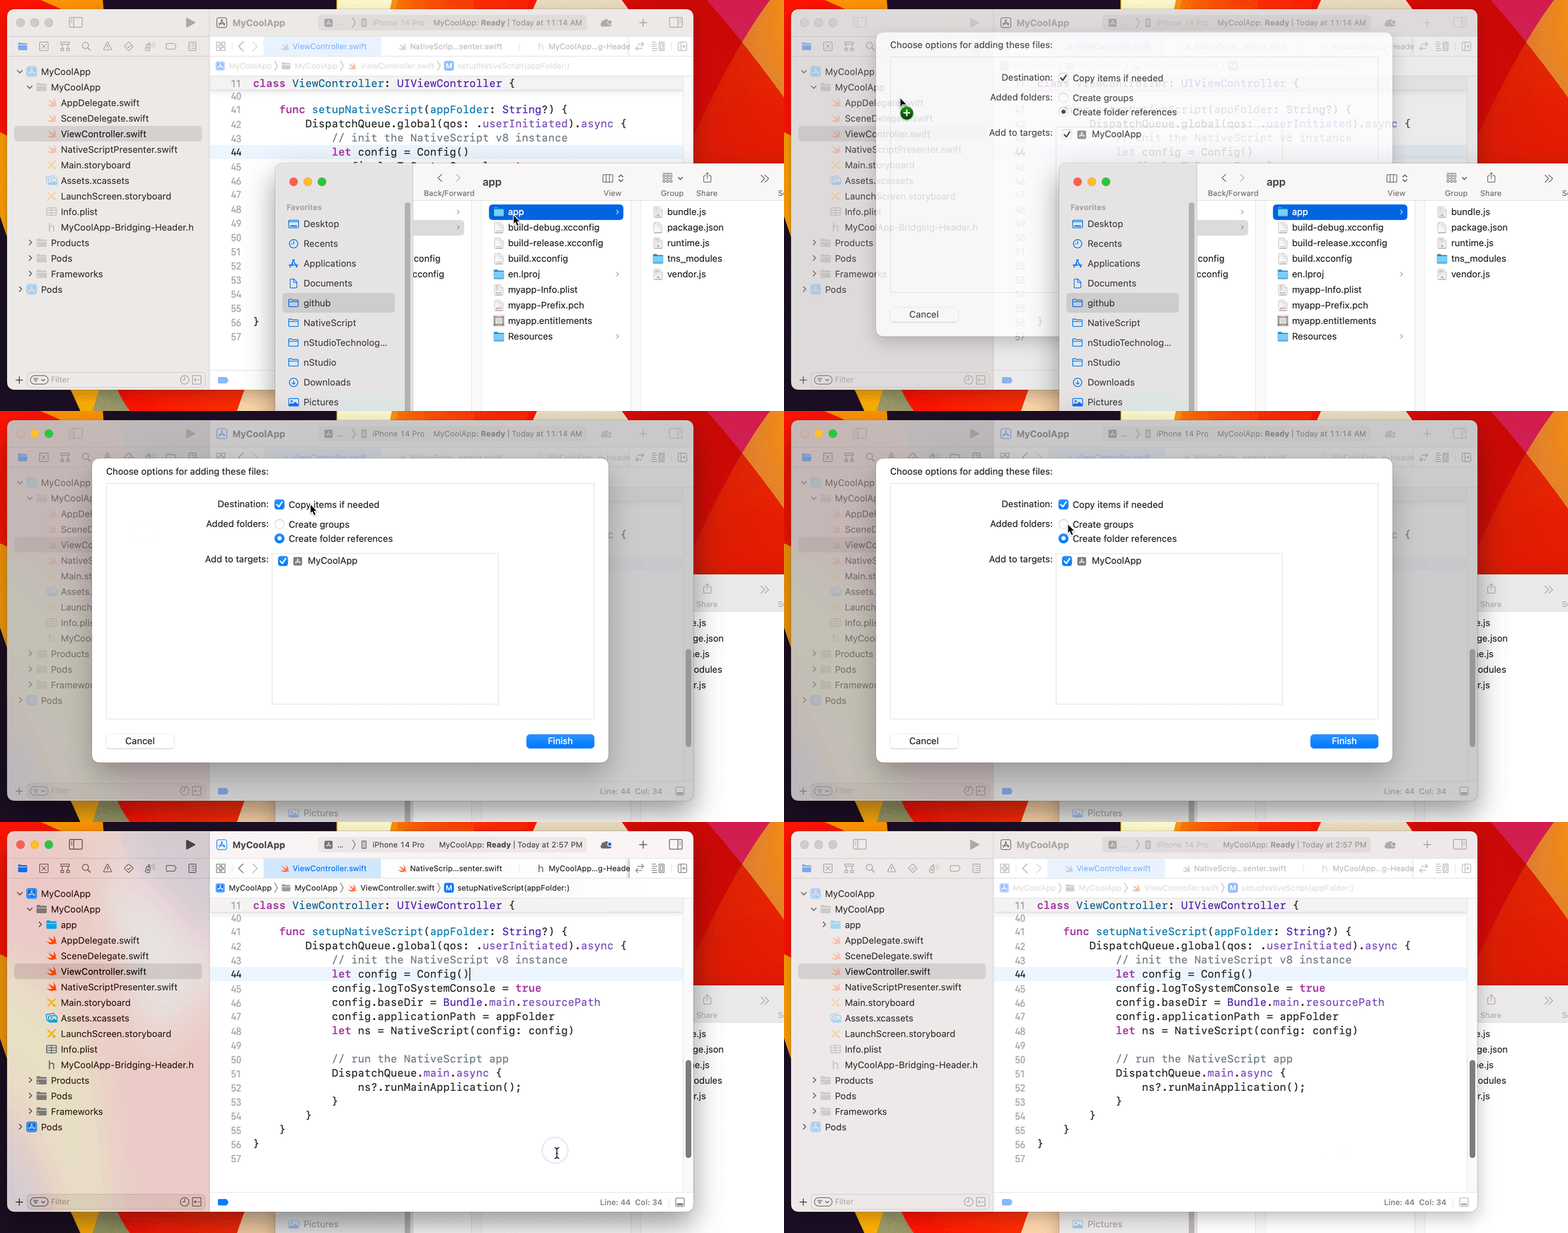
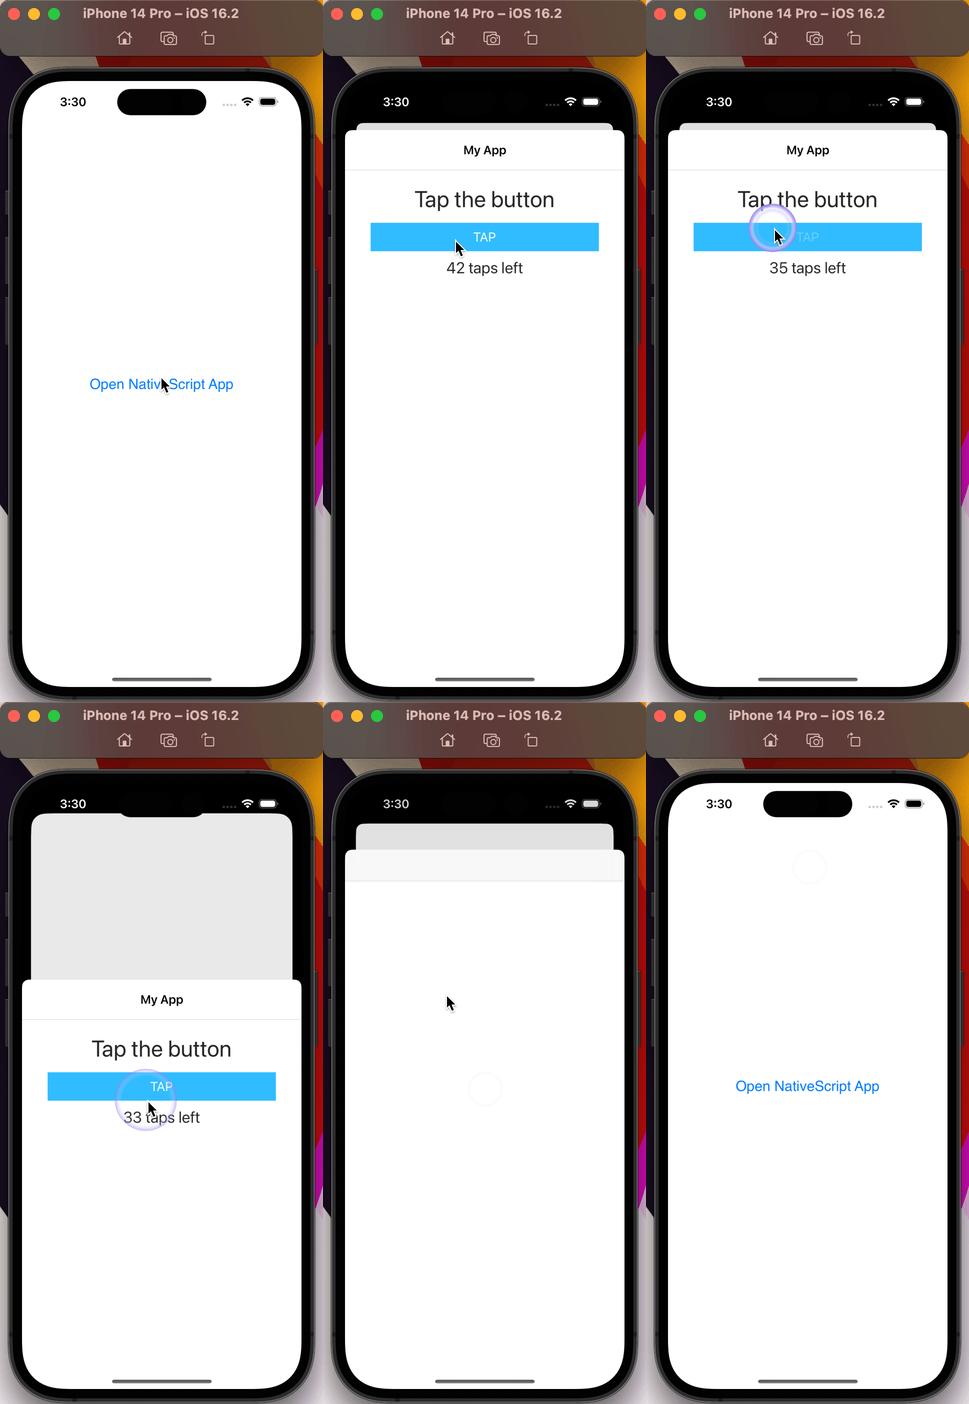
NativeScript 生效了
无论是从头开始使用 NativeScript 创建 iOS 应用,还是将屏幕混合到具有多元化人才团队的庞大现有 Objective C/Swift 应用中,拥有这些类型的选项都能使开发变得令人愉快。
元数据注意事项
在第 2 部分中,我们将介绍如何在嵌入大型 NativeScript 应用时配置自定义元数据,这些应用可能是使用许多不同的第三方插件构建的。
通用的 JavaScript 引擎?
除了将捆绑的 .js 代码作为应用程序运行之外,您还可以使用 SDK 按需调用 JavaScript。
例如,将此更改为
DispatchQueue.main.async {
  ns?.runMainApplication();
}
更改为
ns?.run("console.log('Hello all you good peoples!')", runLoop: false)

let jsStringExample = """
const stringReverse = str => str.split("").reverse().join("");

console.log(stringReverse("tpircSavaJ ot emocleW"));
"""
ns?.run(jsStringExample, runLoop: false)

let jsMathLogic = """
const pi = 3.14;

const surface = 4 * pi * 3390 * 3390;

console.log(`Surface area of Mars is: ${surface}`);
"""
ns?.run(jsMathLogic, runLoop: false)

let jsRandomHexColor = """
const hexColor = () => "#" + Math.floor(Math.random() * 0xffffff).toString(16).padEnd(6, '0');

console.log(`Random hex color: ${hexColor()}`);
"""
ns?.run(jsRandomHexColor, runLoop: false)

let jsDayDiff = """
const dayDif = (date1, date2) => Math.ceil(Math.abs(date1.getTime() - date2.getTime()) / 86400000);

dayDif(new Date("2023-02-14"), new Date("2023-02-16"));
"""
ns?.run(jsDayDiff, runLoop: false)

let jsArrays = """
const average = arr => arr.reduce((a, b) => a + b) / arr.length;

console.log(`Average is: ${average([21, 56, 23, 122, 67])}`);
"""
ns?.run(jsArrays, runLoop: false)

let jsUsingNativeScript = """
console.log(UIApplication.sharedApplication);
"""
ns?.run(jsUsingNativeScript, runLoop: false)

// As expected, any UI related tasks should happen on main thread
// For example, constructing a platform alert and displaying it...
// ...using NativeScript alone.
DispatchQueue.main.async {
  let jsUsingNativeScriptAlert = """
  const alertController = UIAlertController.alertControllerWithTitleMessagePreferredStyle('Oh Hi!', `Well this is interesting isn't it?`, UIAlertControllerStyle.Alert);
  alertController.addAction(
      UIAlertAction.actionWithTitleStyleHandler('Yes, it sure is.', UIAlertActionStyle.Default, () => {
          console.log('alert dismissed.');
      })
  );
  const viewController = UIApplication.sharedApplication.keyWindow.rootViewController;
  viewController.presentModalViewControllerAnimated(alertController, true);
  """
  ns?.run(jsUsingNativeScriptAlert, runLoop: false)
}
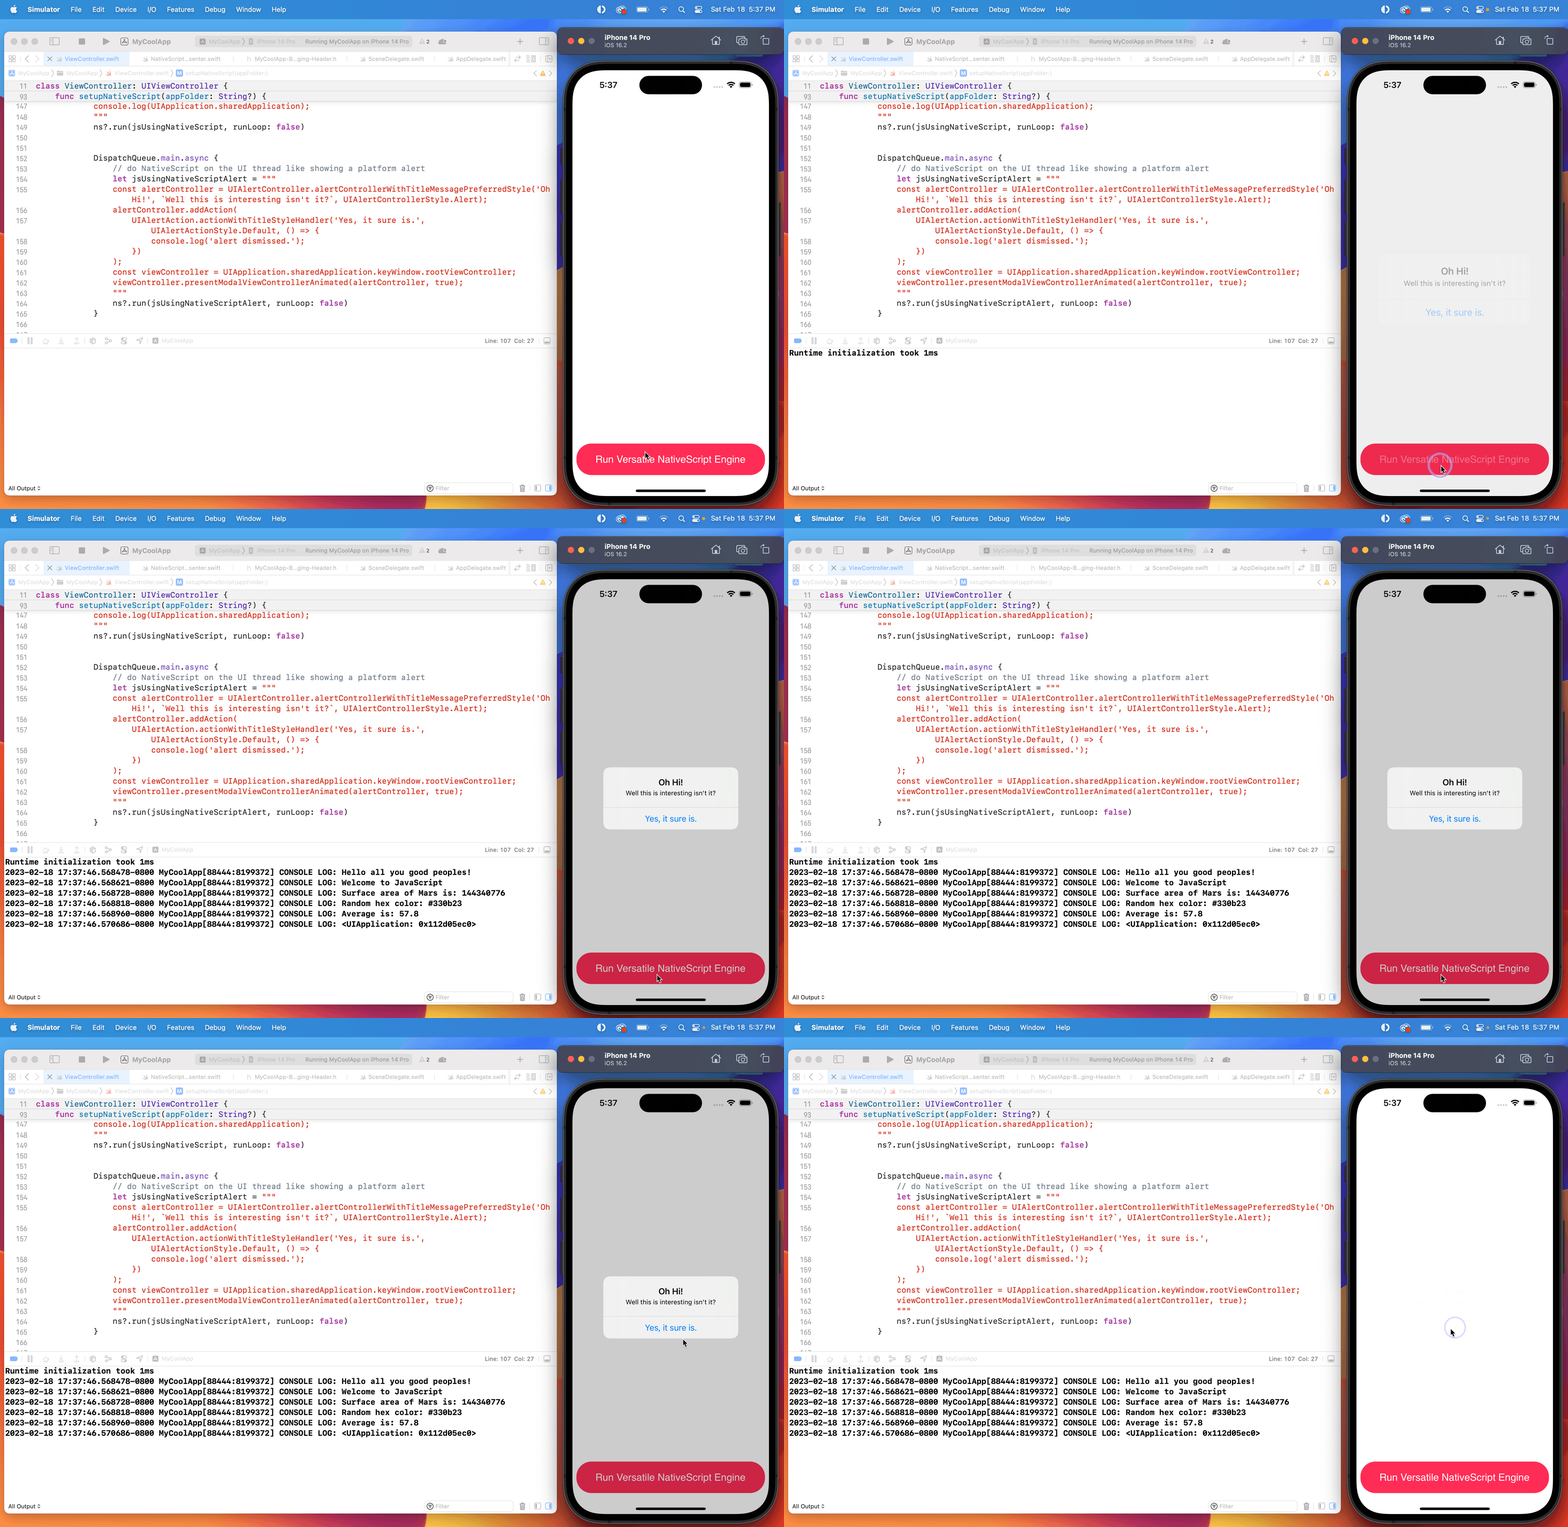
现在,当您运行它时,您将在 Xcode 和设备上看到以下输出
示例代码库
您可以克隆此示例代码库以尝试一个完全可工作的示例。
需要专业帮助?
Azbouki 软件成立于 2019 年,专门从事 NativeScript 运行时开发、自定义功能和开发者工具。如果您需要在功能开发、性能优化或特殊用例方面获得帮助,请随时与我们联系。